How to use Your Blog for Exhibition History

In this post I provide step by step instructions on how to use your blog for Exhibition History. By using your blog posts for listing your exhibition history you will not only have something to blog about but also have a way to share more about your work.

To see a live example of what I mean by an expanded CV please visit my exhibitions category at Kim Bruce Fine Art

STEP 1 Create a new category

Go to Posts > Categories and create a new category named “Exhibitions”. Don’t forget to click the   big blue button the says “Add New Category” (I know goes without saying).

create-new-category

STEP 2 Create a new blog post

Go to Posts > Add New and create a blog post with the name of your exhibition.

Add the invitation as the featured image or any other good quality image that represents the show. I set the invite from my last solo show at Dade Art & Design Lab as the feature image of this post.

You’ll find the “Set Feature Image” to the right of the editor near the bottom

feature-image

If you use one of the David themes this image will appear full width across the top of the page as long as the image is at least 640 pixels wide. If it is a smaller image then will still appear above the post title only smaller. For other themes insert the image on the page. If your theme will show a thumbnail with excerpts then make sure you set a featured image as well as inserting on the page.

Now for the content. Add the exhibition details, date, opening reception, etc; just like a regular invite. If you have an exhibition statement you can use it here or write something about the show and the work. Other content to consider would be reviews, links to reviews, interviews, anything to do with the show.


You can generate a Gallery specifically for the exhibit. Also, include installation shots, pictures from the opening and images of people interacting with your work.

STEP 3 Select a publish date

Produce a number of posts to include in the new exhibition category by selecting from your past exhibitions and making a new post for each. In WordPress you can back date your publish day to be any time in the past, so back date to a week or more before the scheduled opening. If you prefer not to create a bunch of new posts and do all the backdating just start from your most recent exhibition and go forward from there.

publish-date

Don’t forget to select the new category and add some tags before publishing, otherwise your post is going to be filed as “uncategorized” and won’t show up in the “Exhibitions” category.

STEP 4 Add the category as a menu item

The Last step is to put the new category into your menu. You can add a category as a menu item by selecting it under Appearance > Menus. Once it is in the menu it looks like a regular menu item only it goes to your blog category archive.

add-menu

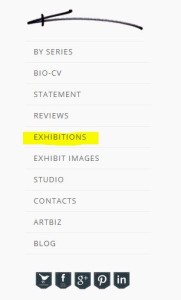
Below is a screenshot snippet of the “Exhibitions” category in my menu at KimBruce.ca. See the entire screen at my fine art site.

category-menu

That’s it, you now know how to use your blog for exhibition history and there by have content to blog about and an exhibitions archive.

If you create an exhibition history using a blog category please come back here and post us a link in the comment area so we can all come and visit your exhibition history.

Artist Website Portfolio Page

The images that are presented on any artist website portfolio page have to be organized, curated and re-sized for the web. The most overlooked item that also belongs on every artist website portfolio page is descriptive TEXT. Tell us in  words what we are looking at.

Most artists have more than one group of images to include on their portfolio page. With a WordPress site and the Nextgen Gallery plugin you can organize your work into separate galleries and create an album that acts as a container for your galleries.

When you include text with these images, you are not only informing people, you’re influencing them to click-through to see the entire body of work. You can easily add this text in NextGen Gallery or directly on the portfolio page.

The NextGen Album

There are two types of albums; the extended version that shows a feature thumbnail and a gallery description. The other is the compact version that only shows the thumb.

Your main portfolio page could have an album that contains your all your galleries. If you use the extended version you can write a gallery description that will show next to the thumb. This text is inserted inside the gallery. If you  use the compact version that displays only the featured thumbnail, then you need to add some text to the page instead.

The Extended Version

Artist website portfolio page
Extended version of NextGen Gallery Album

Here, as an example, is Christine Eckerfield’s site using the extended version of the album.

The description is added inside the gallery not on the actual portfolio page. This text is a short artist statement about this body of work and tells people what to expect if they click-through. It’s your job to get them to click-through.

The Compact Version

compact-liz
Compact version of NextGen Gallery Album

Here is an example of the compact version.

Rather than use the extended version of the album which stacks the galleries vertically, Liz Sullivan uses the compact album.

The compact album shows only a row of horizontal thumbs and title, without the descriptive text, so Liz wrote about each series of work in paragraphs below. This text, written directly on the page, adds context and frames your work with meaning.

Including text is extremely important! It helps site visitors understand your work and approach to your work. Often it affects their decision on whether or not the click-through and look at the full body of work.

The Galleries

Once a visitor clicks through to view a full body of work they typically see multiple rows of thumbnails that enlarge to full size image.  It is important to curate your work and place your strongest work first, starting in the top left corner (that’s the typical starting point for most people).

Remember the descriptive text that I talked about above; include it on the gallery page as well. You may have a longer artist statement about each of your series. In this case you can select or craft one or two sentences to use on the portfolio page with the album and then use the full statement on the gallery image page.

If you craft one or two sentences you can also use it as a meta description for search engines.

Whether you use an artist website portfolio page with an album with all your galleries OR individual gallery pages without an album, it is imperative that you include descriptive text with images. It is our job as artists to inform and educate people about our work, using words.

A picture may be worth a 1000 words but words are worth 1000’s of understandings.

Artist Website Contact Page

An artist website contact page lists ways people can contact you. It can and should be more than just a contact form or an email address. List more information on this page, such as…

  1. Two forms of contact in case one fails. This is usually a phone number and the contact form. Some people publish their actual email to make it easy for visitors to content them. If you publish your actual email address you are leaving yourself open to be harvested by spammers. People are getting use to contact forms and they really do reduce spam.
  2. A picture of you, your work or your store front.
  3. Your full name, address and phone number. Some people don’t like to include their street address; the minimum would be your location – town or city.
  4. Gallery representation including full name, address, phone number and a link to their website. You can create a separate page to list your representation should the list be long.
Artist Website Contact Page
Artist Website Contact Page of Nicole LeBoutillier

If you welcome studio visits:

If you prefer appointment add your phone number. Use your cell phone number if you rather not use your home phone.

If you have an open studio list the hours that you are available and make sure you are available.

The artist website contact page is usually the easiest page to create content for.

Providing only a contact form without any further information is the biggest omission I see on artist websites contact pages. Suggest why people could contact you.

Some examples could be…Please contact me if you would like further information:

  1. …on my work
  2. …inquire on purchasing work
  3. …join my email newsletter
  4. …receive invitations for upcoming exhibitions
  5. …just want to say HI!

It doesn’t take a lot of effort to make a contact page professional; an image, your info and a form, that’s it!

Why Add Image Meta Data

A new client said “The re-sizing is working, I am not sure about why I am doing the metadata template.”

There’s no denying that resizing, renaming, optimizing and filling in the file info, also known as metadata, is a time-consuming process.

Why Add Image Meta Data? It is worth the time; this is why…

1. Images of your artwork will travel, either by email for submissions or uploaded to your website. Any file info that you provide goes with the image, in other words, it’s embedded. This includes copyright notices, keywords and the works description (name, size, medium).

File Info task pane in Photoshop

2. Visitors to your website may pin your images to Pinterest. When pinning an image with file info, that info is automatically extracted and fills in the caption. You do not have to rely on people to do the right thing and give credit or take the time to look for it.

3. Now here’s the best thing about filling in metadata templates for your images. You only have to do it once! AND when you upload them to NextCellent Gallery the Alt title, image description and keyword fields are filled in automatically. Copy or move images between galleries; the file info goes with it.

Descriptions in Nextgen Gallery
Fields are auto filled in NextGen Gallery

A little work will go along way to brand and protect your images.

Any questions on why add image metadata? What has your experience been like when adding the metadata file into in Photoshop?


Choosing a Domain Name for an Artist Website

10 Tips for Choosing a Domain Name for an Artist Website and using your Domain Name.

What’s a Domain Name?

You can’t have a website without a web address. A domain name is your website address and it is what people type into the address bar of a web browser that will take them to your site files; your website.
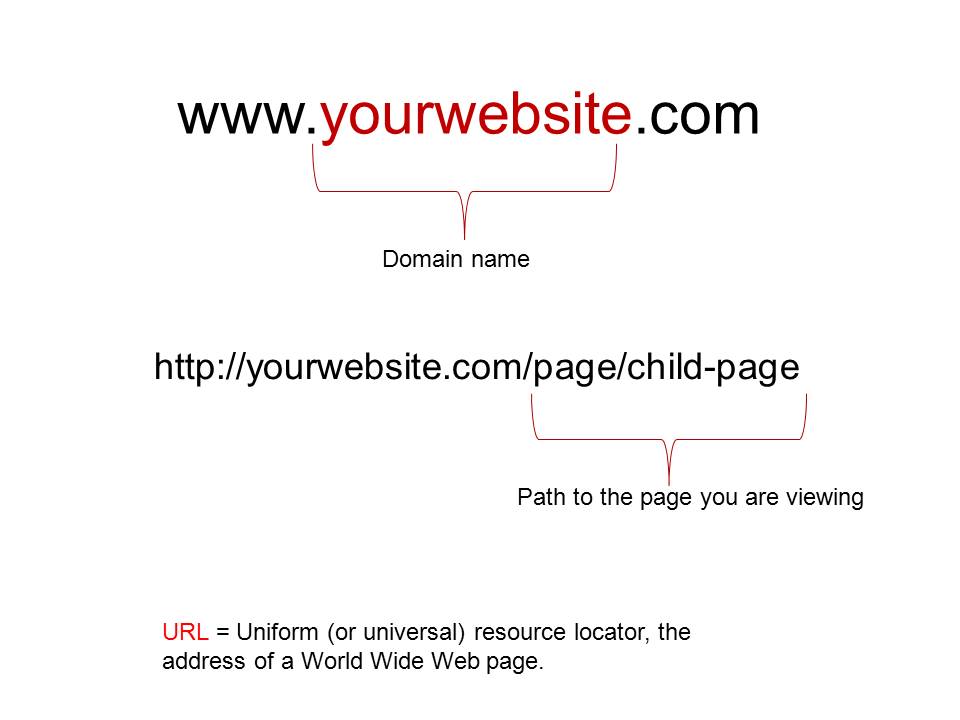
A domain is a name that you choose that appears between the www.AndThe.com

A typical URL (an acronym for Universal Resource Locator) includes your domain name plus the path to locate specific pages on the hosting server.

YourWebsite.com will direct people to your landing or home page, while everything after the .com/ directs people to specific pages on your site.

The www is now optional. Visitors don’t have to type it in to the browser to reach your site.

How Do I Get a Domain Name?

Domain names can not be bought outright. You lease your domain name through a Domain Name Registrar for a period of time from 1 to 10 years. The process is called registering.

If you do not renew your domain name at the end of the term it can come back on the market and someone else can register it. There is a 30 day grace period so if you forget to renew your domain name you won’t lose it if you renew within that grace period.

There are many registrars out there, with different prices and features. They all have access to the same central database of domain names, so there’s no difference in selection or availability of names between registrars.

Rules for choosing a Domain Name

The international body that governs the registration and use of domain names has set a few rules. When choosing, keep in mind that domain names:

• Can use letters, numbers and hyphens
• Cannot begin or end with a hyphen
• Are limited to 63 characters in length
• Are NOT case-sensitive
aside: browse the 10 tips using the Listic Slider above and see how you can use WordPress’s media library with it.

Tip #1:

As an artist you need to ask yourself how you want to go down in art history.

Choosing the right domain name is part of this decision.

For instance choosing a descriptive or keyword domain name like EncausticSculpture.com may be what I, as an artist, have come to be known for, but it is not my brand. I am my brand because it is me, Kim Bruce, that makes the art.


Tip #2:

You can either focus on branding, or focus on keywords. KimBruce.ca is my brand, while EncausticSculpture.com focuses on my keywords. I have registered both and point them to the same site, but I use kimbruce.ca as my primary domain.

You can use both types of domain names and point one to the other. But I submit that if you use your keywords properly in the content of your website, your site will be indexed by the search engine for that term.

Try entering the search term encaustic sculpture in Google and you will see that KimBruce.ca comes up for that term.

Tip #3:

Bear in mind that using a keyword based domain name does not individualizing your work. A site with the name Encaustic Sculpture could be any ones work. Perhaps it is a site that collects images of work by all encaustic sculptors from all over the world. It is for this reason that I chose not to use it as my main domain name.

If you feel strongly about using keywords in your domain name consider a name that includes both your name and your keyword. For example I could register the domain name KimBruceEncausticSculpture.com but I won’t because I think it is to long and hard to explain. See Tip #7

Tip #4:

Always buy a .com if you can, it is still the most prized domain name extension (suffix). If the .com has already been registered consider adding a descriptor to your name as described in Tip #3.

That is what I had to do to register a .com for my fine art site.

KimBruce.com is registered to a realtor in the USA, so I added fine art and registered KimBruceFineArt.com

Other examples are:
YourNameArt.com
YourNamePhotography.com
YournameJewellery.com
YourNamePottery.com

When you create your site make sure you use “Your Name Pottery” or what ever your descriptor is in the title. Search engines will add value to your site  if your domain name is in your site tile.

Tip #5:

It is important to remember that your name can be registered by more than one person just by registering it with a different extension.

This means that:
Yourname.com
Yourname.ca
Yourname.net
Can all be registered by 3 different people, which in turn brings up 3 different websites.

Don’t limit yourself to a single must-be-perfect domain name. Buy more than one and use domain forwarding to point them all at the same website.

Tip #6:

It is hard to over invest in domain names, if you can afford to buy more than one it will help protect your brand. They are around $10 to $12 each.

The most I’ve ever paid for a .com domain for one year is $11.99.


Tip #7:

Find a “no explanation needed” domain name. Be aware of how you’re going to tell people about your website.

You can have up to 63 characters in a domain name.  That would be a long name and hard to remember.

5 to 30 characters is the norm.

Don’t be tempted to use dashes or numbers if your name .com is not available. Especially Roman numerals, is it an I or l or an 1. You will be relying on people to remember that. And if it just sounds awkward when speaking your domain name, chose a simpler name.

People are used to having the words run together and more than likely will not remember to add a dash.

Can you explain to a total stranger how to get to your website, without;

  1. spelling words out
  2. explaining what abbreviations mean
  3. explaining what the terms are; like “encaustic”

If not, think simpler, even if that means longer.

Tip #8:

Keep domains in print should be readable by human beings!

When you use your domain name in print, humans are going to have to read and understand it. Capitalization is your friend for printing media since your web address (your domain name) is not case-sensitive. If people type it in the address bar capitalized or not, it will site go to your website.

Use capitalization to distinguish one word from the next when printing business cards, brochures, catalogs.

YourNameFineArt.com

While on the topic of printing, other creative ways to make a distinction between the words of your domain name could be:

Bold every other word

yournamefineart.com

Use a different colour for every other word

youryourfineart.com

Use a different font for every other word

yournameFineArt.com

This also includes your email address.  Be consistent in the way you write (type) your email address and your website address in print and in your email signature.

Tip #9:

Make sure you don’t end up saying something totally unintended.

Sometimes you get unexpected results when you run an otherwise-great phrase all together in one word. My favorite example is a company called Best of Art. When you put that together, you get bestofart.com Oops. Try a less gassy combination of words.

You can not count on people to use your selective first letter capitalization.

Tip #10:

Ask for objective opinion.

When you are considering a domain name, remember that you are going to run it all together with no spaces. As I mentioned in Tip #9, you can use selective capitalization to help out, and you can register domain names with hyphens in them.

Ask somebody to look at it. Get a fresh set of eyes to check it out before you purchase a domain name.

Final Thoughts

Choosing a domain name for an artist website is what you will be building your online reputation on. Once you register and build you site with your domain name of choice, search engines are going to index that way, make sure it is how you want to be known.

Now that you have a domain name and you type it into the address bar of a browser it may return a page similar to this:

That’s because you do not have a website or hosting yet. To use an analogy; just because you bought a parcel of land doesn’t mean it will automatically result in a house being built on it. You have to build it.

A word of advice:
I always recommend that you keep your domain name and hosting accounts separate.
Here’s why… 


Keep Domain Name and Hosting Accounts SEPARATE

WHY keep domain name and hosting accounts SEPARATE?

Your domain name and hosting are two very important accounts. And they should be two separate accounts.

I’m sure you are asking why not just get both in one account?

BECAUSE

You can easily change host providers or change designers if you have control of your domain name. Have domain name will travel. In other words if you don’t have control of your domain name you have to ask for it and sometimes this it is not easily obtainable.

More information and to read a detailed article about domain names

Reasons why you might change host providers

  • The price increased a lot
  • Technical support is poor
  • Your site loads to slow
  • They aren’t keeping up with the programming language upgrades
  • You can’t update WordPress

Over Selling Warnings

Be careful and have a good look at your sign-up form. I have seen forms that have check box’s checked by default that add a number of options that will increase the amount of your final bill. These can be anything from domain privacy, a hosting package from the domain name registrar, a domain name from the hosting provider.

Un-reputable hosting companies may try to sell you a private SSL certificates which the average website doesn’t need.

Once you have purchased your domain name and hosting from 2 separate companies you will be sent an email from each. These are extremely important emails as they contain all your account information, login and passwords. Print them off and keep them somewhere safe.